Drip Content
The Drip Content add-on for Restrict Content Pro lets you define schedules for when your content will become available to a member instead of it becoming available immediately when they join. The schedules you define instruct Restrict Content Pro (RCP) to release the content based on the member’s join date.
If a member tries to view the content before the schedule allows it, they see the standard restricted message that Restrict Content Pro normally shows when a member does not have access to content. Once the time period defined in the schedule has passed, the content will be visible to the member.
Drip Content is a great way to retain members and increase your revenue.
Installing The Drip Content Add-On
Download and install the plugin from your account dashboard here. If you need help installing the plugin, refer to the WordPress plugin installation documentation.
To license the plugin, please view our “How Do I License iThemes Products on My Sites” article.
Configuring The Drip Content Add-On
Drip schedules can be defined on subscription levels and on post, page, and custom post types. Two types of drip schedules are supported at this time:
- Content-Type – allows you to schedule the availability of posts, pages, and other custom post types registered on your site.
- Taxonomy – allows you to schedule groups of content based on the taxonomy term they are assigned to.
You can use both schedule types at the same time. Let’s take a look at each drip schedule type.
Note: It's important to understand that Drip Content does not define the actual content restrictions. It schedules the visibility of the content based on the restrictions you already have in place. If you define a drip schedule but do not define content restrictions, the content will not be protected.
Content-Type Schedules
The Content-Type drip schedule type enables you to drip specified posts, pages, and other custom content types based on someone’s membership level. This drip type can be defined in two places – at the post edit screen during content creation, or at the subscription level edit screen under Restrict > Membership Levels. Let’s have a look at each.
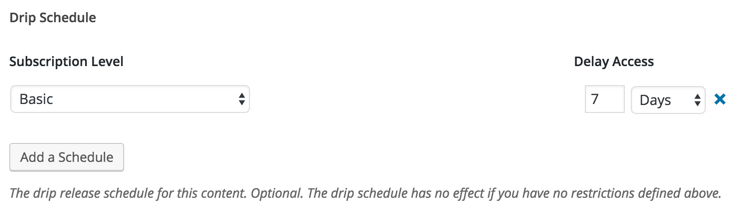
To define a Content-Type schedule on a subscription level:
- Go to Restrict > Membership Levels
- Add a new subscription level or edit an existing subscription level
- Define the schedule(s) using the Drip Schedule controls
- Save the subscription level

To define a Content-Type schedule on a post, page, or other custom content type screen, simply edit the content in question and define the schedule there. For example, to add a schedule to a new blog post:
- Go to Posts > Add New
- Create your post as you normally would
- Define the schedule(s) using the Drip Schedule controls
- Publish the post
 You may have noticed that the controls on the subscription level screen differ from those on the post edit screen. This is because, on the post edit screen, you only have to define the Subscription Levels and Delay Access settings. We already know the post information.
Any schedules made on the post edit screen will automatically show up under the appropriate subscription level screen under Restrict > Membership Levels. Likewise, any schedules made on the subscription level screen will show up on the appropriate post edit screen. They are the same schedule and are just displayed differently based on where they are being displayed.
Taxonomy Schedules
The Taxonomy drip schedule type enables you to define schedules on categories, tags, and other custom taxonomies. This makes it easy to manage schedules for many pieces of content at once, without having to edit each piece of content to define the schedules.
WordPress comes with Categories and Tags built-in. Drip Content supports these taxonomies, as well as any other public, custom taxonomies that have been registered by other plugins. For example, Easy Digital Downloads registers Product Categories and Product Tags. Drip Content also supports these.
Taxonomy schedules are defined on the subscription level screen under Restrict > Membership Levels. To define a taxonomy schedule:
- Go to Restrict > Membership Levels
- Add a new subscription level or edit an existing subscription level
- Define the schedule(s) using the Drip Schedule controls
- Save the subscription level
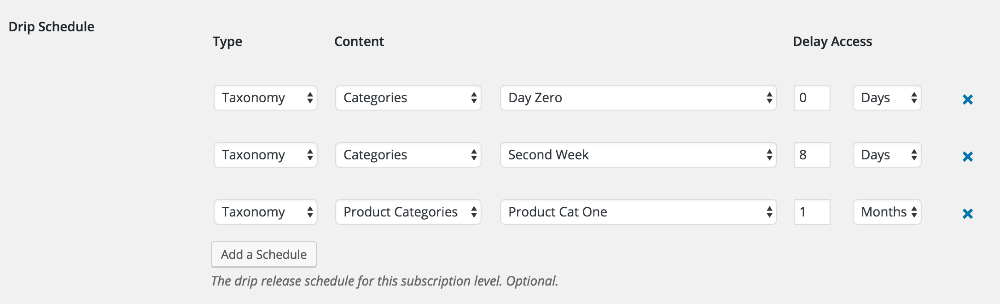 In the example above, all posts in the Day Zero category will be available as soon as the member joins. All posts in the Second Week category will be available eight days after the member joins, and all WooCommerce products in the Product Category named Product Cat One will be available one month after the member joins.
Displaying Member Content
Using the included shortcode, you can display a list of scheduled content that a member will receive with his or her membership. To do that, use the [rcp_drip_member_content] shortcode. By default, the shortcode shows a list of content types and taxonomies that are currently available, as well as a list of upcoming content types and taxonomies with the date they will become available to the member. Let’s have a look.
[rcp_drip_member_content]
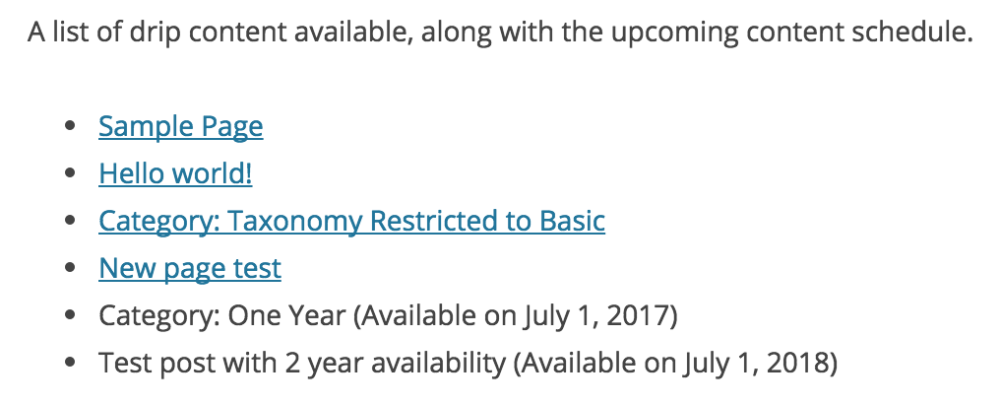
In the image above, the first four items are available based on their defined drip schedule. The member can click and read them. The last two items are the things that are not yet available and will become available at the dates listed. Once those items are available, they will also be linked and available for reading.
Showing Future Items
If you’d rather not show the unavailable items, you can do that by adding a simple option to the shortcode – like this:
[rcp_drip_member_content show_future="false"]
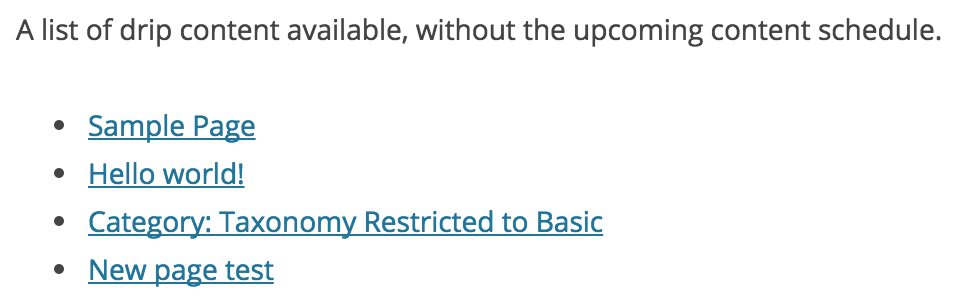
In the above image, the upcoming items are not shown because we instructed it not to do that by using the show_future option.
Sorting The Schedule Display
You can sort the output by specifying the order by the option on the shortcode. Supported sort options are:
- date – sorts the schedules by the date they become available to the member.
- name – sorts the schedules by post/taxonomy name.
Example of sorting by date:
[rcp_drip_member_content orderby="date"]
Example of sorting by name:
[rcp_drip_member_content orderby="name"]
You can add this shortcode to any post or page. When viewing a page with the shortcode, if the user isn’t logged in, nothing shows. Likewise, if the user is logged in but does not have a subscription, or if they have a subscription but their subscription does not have any drip schedules, nothing shows.
How Does It Work With Multiple Memberships?
The membership that gives the customer the most access will always take priority. Here’s an example:
Say you have two membership levels: Membership Level A and Membership Level B. Both grant access to a restricted post. However, Membership Level A has drip settings that delay access until 1 month after registration. Membership Level B has no such restrictions.
If a customer signs up for both Level A and Level B on the same day, then Level A will not give them access to the post yet, but Level B will. Therefore, the customer can access the post because at least one of their memberships does give them access.
Have more questions? Submit a request