PayPal – Standard
As of April 2021, PayPal no longer offers domestic services within India and will only provide support for Indian merchants that do international business.
PayPal Standard is one of the fastest and easiest ways to start accepting payments on your website. It is free to sign up and includes no monthly fees.
Configuring PayPal Standard is simple and only takes a few moments.
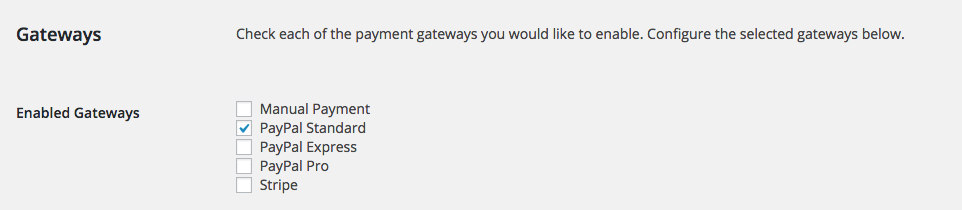
First, go to Restrict > Settings > General and enable PayPal Standard:
Next, under PayPal Settings, enter the email address that is connected to your PayPal account.
The email address is the only required setting for PayPal Standard. We also highly recommend entering your PayPal API keys. This enables extra features, such as allowing Restrict Content Pro to process membership cancellations. Without API keys, members will not be able to cancel subscriptions from inside Restrict Content Pro. If you wish to enter your API credentials, see this help page for assistance in obtaining API credentials.
There are three additional optional settings you may configure for PayPal Standard:
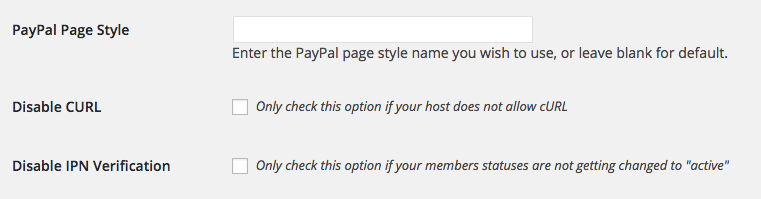 The PayPal Page Style lets you specify the page template that you wish to use on PayPal for customers that purchase a membership. See PayPal’s help doc for more information about custom page styles.
Disable cURL should only be checked if your site does not support cURL. Usually, this is not needed.
Disable IPN Verification should only be checked if the PayPal IPN cannot be processed properly. If your members’ accounts do not get set to Active automatically, as described in this FAQ, enable this option.
Instant Payment Notifications
The PayPal IPN is how Restrict Content Pro communicates with PayPal and is the system RCP uses to detect when a subscription has been updated (payment made, account cancelled, etc).
Restrict Content Pro will attempt to enable the IPN for you automatically, but in rare cases, it has to be done manually from your PayPal account.
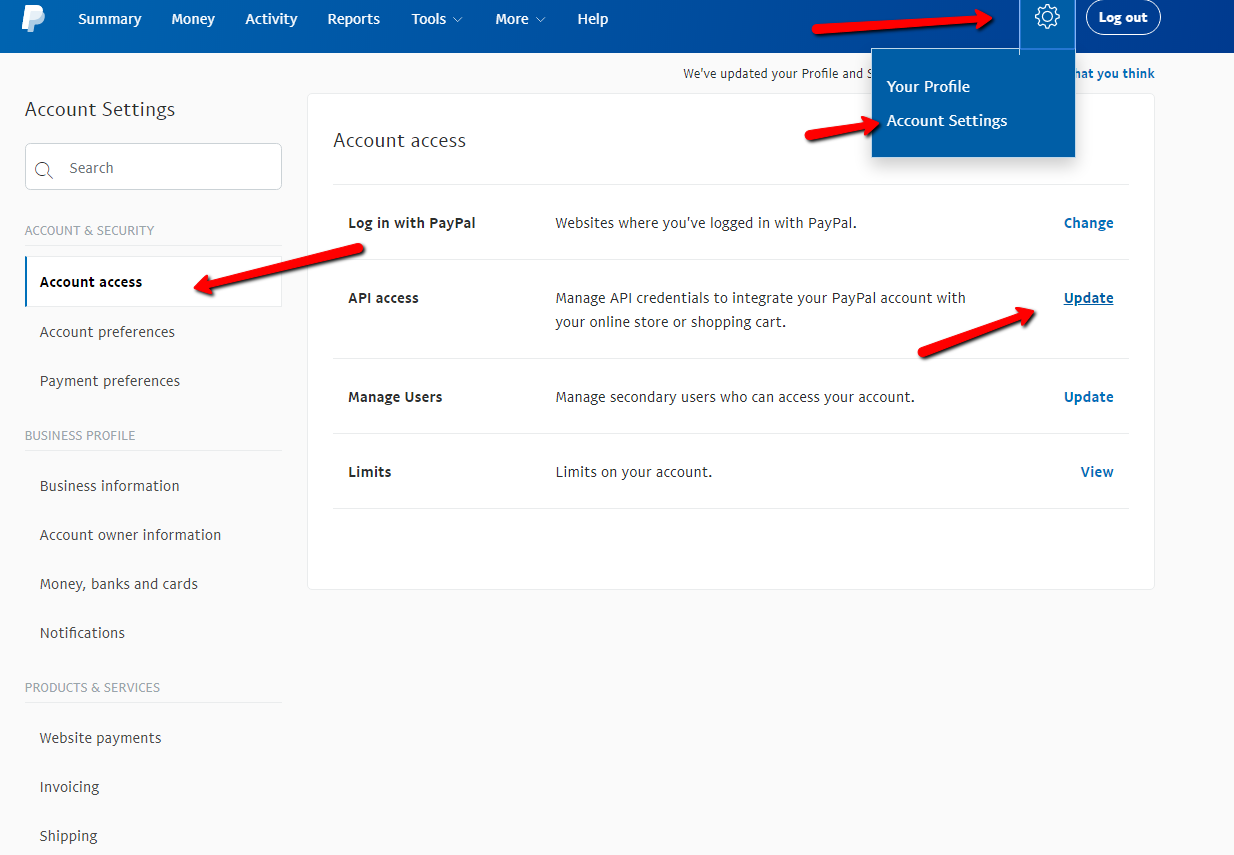
To access the IPN settings, log into your PayPal account and got to Account Settings > Website payments > Instant Payment Notifications:
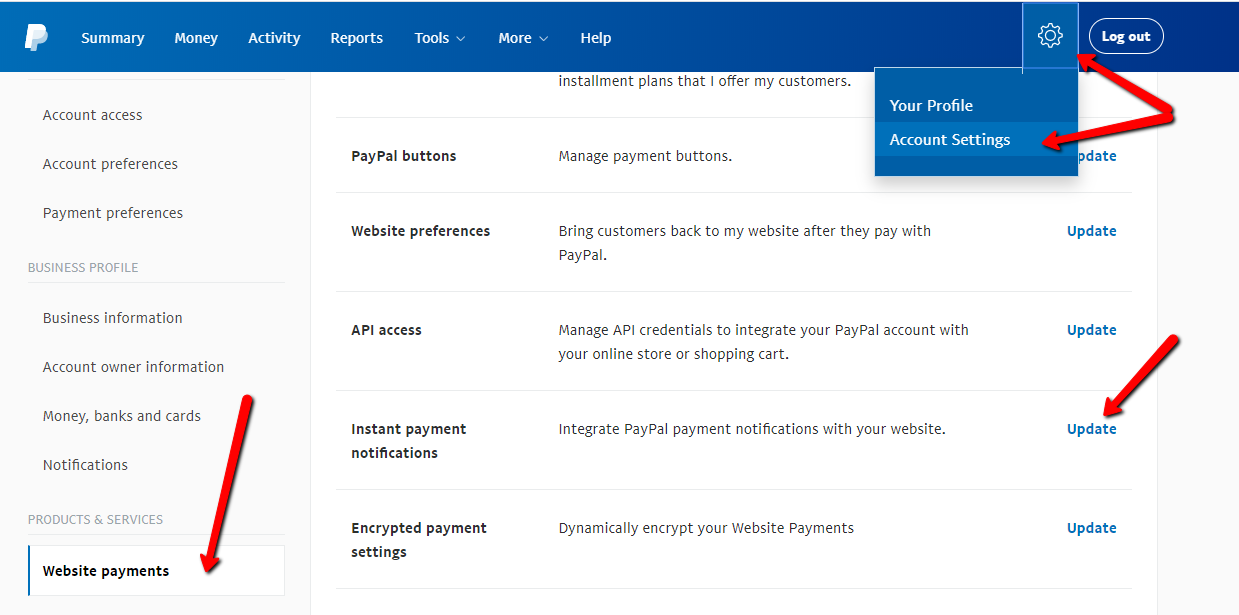
If you can’t locate the option try accessing it via this link directly: https://www.paypal.com/cgi-bin/customerprofileweb?cmd=_profile-ipn-notify
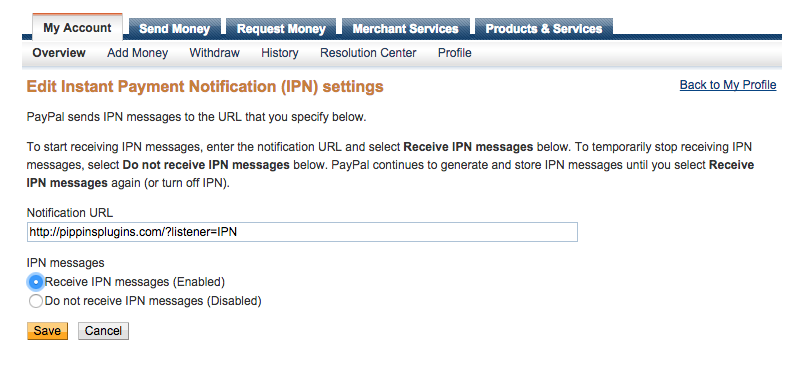
Click on Update. Here you will be able to enable the IPN and set the URL. The URL should be set to:
http://yoursite.com/?listener=IPN
Note: "YOURSITE.com" should be replaced with your actual domain name. If your website is behind HTTPS then adjust the URL to use https:// instead of http://
Note: If you're migrating PayPal recurring subscriptions from another platform that also used IPNs then you may want to set up a 301 redirect on old IPN URL to the new IPN URL for RCP. This will ensure that any IPNs still being sent to the old URL will get correctly forwarded to the new one.
Update the IPN Encoding Settings
It’s also a good idea to check your encoding settings in PayPal to ensure they’re set correctly. This can avoid issues with special characters when Restrict Content Pro handles data sent back from PayPal. To find these settings follow the steps below:
- Log into your PayPal account
- Go to your profile
- Look for the “PayPal button language encoding” section under the My selling tools.
- You can find the language option in the following URL of your account (in case you cannot locate the menu item in your PayPal account):
https://www.paypal.com/cgi-bin/customerprofileweb?cmd=_profile-language-encoding - Make sure your website language is set to the correct language
- Click the more options button
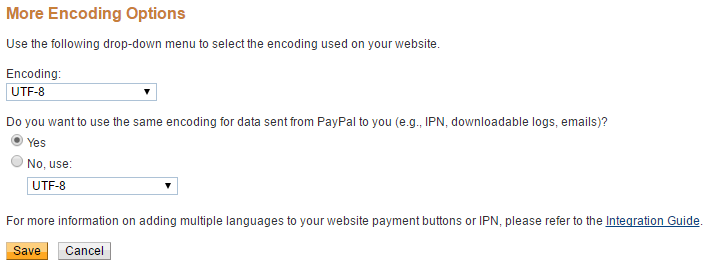
- Make sure encoding is set to UTF-8
- Then save settings

Then you can choose your encoding settings. In most cases that should be UTF-8 as shown below.
API Keys
For certain features in Restrict Content Pro to function, such as subscription upgrades, API keys will need to be entered in Restrict > Settings > Payments.
To access the API keys follow the screenshot below or go to https://www.paypal.com/us/cgi-bin/webscr?cmd=_profile-api-access. Log in with your normal PayPal account.
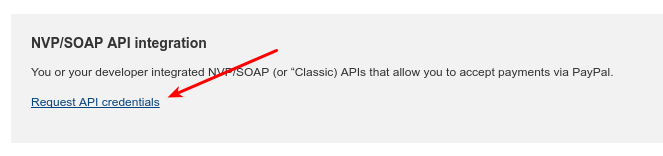
Once you’re logged in, find the box labelled NVP/SOAP API Integration on the API Access page. In that box click Request API credentials.
On the next page look for the box labelled Request API signature. Make sure the radio button in there is checked, and then click Agree and Submit.
On the next page, you’ll have a list of the API fields.
- API Username
- API Password
- Signature
Each item will include Show link next to it. Clicking Show will reveal the proper string for each item.